Introduction to Butterfinger Balls
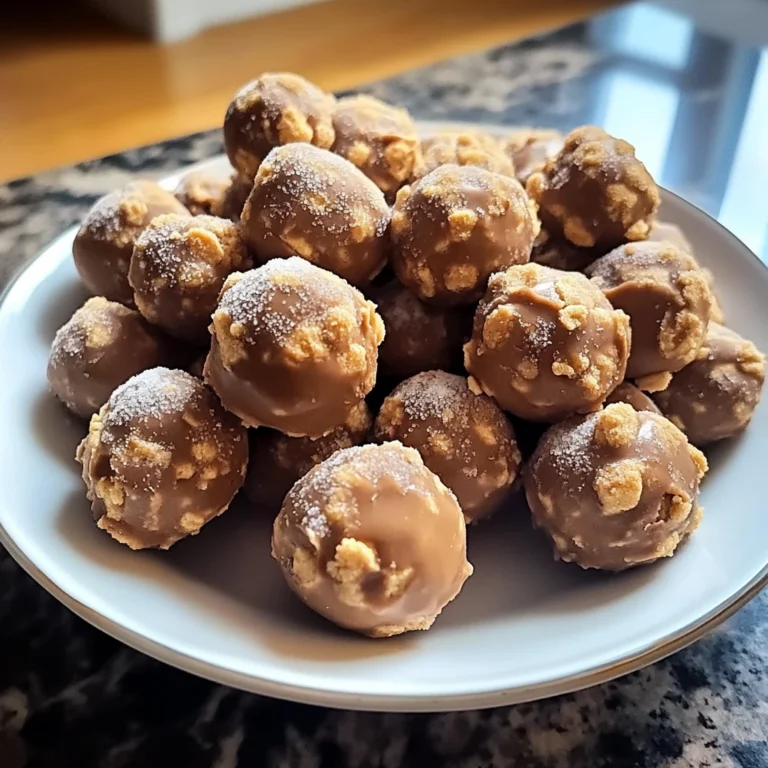
Get ready to indulge in a truly delectable treat – Butterfinger Balls! These irresistible bite-sized confections combine the beloved flavors of Butterfinger candy bars with a creamy, peanut butter-infused center, all dipped in a rich chocolate coating. Whether you’re looking for a decadent dessert, a sweet snack, or the perfect addition to your party spread, Butterfinger Balls are sure to delight your taste buds and impress your guests.
Table of Contents
What Are Butterfinger Balls?
Butterfinger Balls are a homemade candy that takes the iconic Butterfinger flavor and transforms it into a delightful, bite-sized treat. The recipe starts with a base of peanut butter, butter, and powdered sugar, which is then mixed with crushed Butterfinger pieces to create a flavorful, dough-like mixture. These balls are then coated in a smooth, melted chocolate, giving them a beautifully glossy finish and an extra layer of chocolatey goodness.
Why You Will Love This Recipe
Butterfinger Balls offer the perfect balance of sweet, salty, and crunchy flavors. The peanut butter and Butterfinger combination is a classic pairing that never disappoints, while the chocolate coating adds a luxurious touch. These no-bake treats are incredibly easy to make, require just a few simple ingredients, and can be customized with a variety of toppings and decorations to suit your personal preferences. Plus, they’re a crowd-pleasing snack that’s perfect for parties, movie nights, or just satisfying your sweet tooth.
Ingredients for Butterfinger Balls
Main Ingredients
- 4 tablespoons butter, softened
- 1 teaspoon vanilla extract
- 1 cup peanut butter (avoid all-natural varieties that separate)
- 1 cup powdered sugar
- ¾ cup graham cracker crumbs
- ½ cup crushed Butterfinger bars
- 8 ounces chocolate bark or chocolate chips for coating
Optional Ingredients and Their Benefits
To take your Butterfinger Balls to the next level, you can consider adding a few optional toppings and garnishes. Sprinkling extra crushed Butterfinger pieces over the chocolate-coated balls adds an extra crunch and Butterfinger flavor. Decorative sprinkles or a light dusting of coarse sea salt can also provide a beautiful finishing touch and add visual appeal. These optional toppings not only enhance the overall presentation but also complement the rich, indulgent flavors of the Butterfinger Balls.
Step-by-Step Instructions
Mix Base
In a large bowl, combine the softened butter, vanilla extract, peanut butter, powdered sugar, graham cracker crumbs, and crushed Butterfinger bars. Mix the ingredients together until they are fully combined and the mixture has a dough-like consistency.
Shape Balls
Take the peanut butter mixture and roll it into 1-inch balls, placing them on a parchment-lined baking sheet as you go. Once all the balls are formed, place the baking sheet in the freezer for 20-30 minutes to firm up the balls.</
Melt Chocolate
While the balls are chilling, melt the chocolate bark or chocolate chips in a microwave-safe bowl, stirring every 30 seconds until the chocolate is smooth and fully melted.
Coat Balls
Remove the firm Butterfinger Balls from the freezer and, one by one, dip them into the melted chocolate, making sure to coat them fully. Allow any excess chocolate to drip off before placing the coated balls back on the parchment-lined baking sheet.
Add Toppings
If desired, sprinkle the freshly coated Butterfinger Balls with extra crushed Butterfinger pieces, festive sprinkles, or a light dusting of coarse sea salt while the chocolate is still wet.
Chill & Serve
Finally, place the baking sheet with the coated and topped Butterfinger Balls in the refrigerator until the chocolate is fully set, about 30 minutes to an hour. Once chilled, your delectable Butterfinger Balls are ready to be enjoyed! Store them in an airtight container in the refrigerator until ready to serve.

Tips for Perfect Butterfinger Balls
Choosing the Right Peanut Butter
For the best texture and flavor, it’s important to use a traditional peanut butter that doesn’t separate, rather than an all-natural variety. The non-separating peanut butter will create a smoother, more cohesive mixture for your Butterfinger Balls.
Storing Your Butterfinger Balls
Properly storing your Butterfinger Balls is key to maintaining their freshness and texture. Keep them in an airtight container in the refrigerator, where they will stay fresh for up to 1 week. You can also freeze the uncoated balls for up to 3 months, then thaw and coat them in chocolate when ready to serve.
Customizing Toppings
While the classic Butterfinger flavor is hard to beat, feel free to get creative with your toppings. Try drizzling the chocolate-coated balls with caramel or white chocolate, or rolling them in chopped nuts, sprinkles, or crushed graham crackers for added texture and visual appeal.
Serving Suggestions
Pairing with Beverages
Butterfinger Balls pair exceptionally well with a variety of beverages. Serve them alongside a hot cup of coffee or espresso for a decadent after-dinner treat. They also make a delightful accompaniment to a cold glass of milk or a rich, creamy hot chocolate on a chilly day.
Perfect for Parties and Celebrations
These Butterfinger Balls are the ultimate crowd-pleasing dessert. They’re perfect for sharing at parties, potlucks, or any special occasion. Arrange them on a platter or in individual cupcake liners for a fun and visually appealing presentation that’s sure to impress your guests.
Nutritional Information
Calories and Macronutrients
Each Butterfinger Ball contains approximately 150 calories, with a macronutrient breakdown of 9 grams of fat, 18 grams of carbohydrates, and 3 grams of protein. While these treats are indulgent, they can be enjoyed in moderation as part of a balanced diet.
Healthier Alternatives
For a slightly healthier twist, you can experiment with using dark chocolate or sugar-free chocolate chips for the coating, which may reduce the overall sugar content. Additionally, substituting almond butter or cashew butter for the peanut butter can provide a different flavor profile while maintaining the creamy texture.
Frequently Asked Questions
Can I use crunchy peanut butter?
While you can use crunchy peanut butter in this recipe, the texture of the Butterfinger Balls may be a bit more uneven. For a smoother, more consistent texture, it’s best to use a creamy peanut butter variety.
How do I make these gluten-free?
To make these Butterfinger Balls gluten-free, simply substitute the graham cracker crumbs with crushed gluten-free cookies or crackers. You can also use a gluten-free chocolate coating or melt down gluten-free chocolate chips for the dipping process.
Can I freeze Butterfinger Balls?
Yes, you can absolutely freeze the uncoated Butterfinger Balls for up to 3 months. When ready to serve, simply thaw the balls at room temperature, then dip them in the melted chocolate and add your desired toppings.
What can I substitute for Butterfinger bars?
If you can’t find Butterfinger bars or prefer a different flavor, you can use crushed Heath bars, Snickers, or even Reese’s Peanut Butter Cups in place of the Butterfinger. This will give you a similar crunchy, peanut butter-based texture and flavor profile.
Conclusion
Butterfinger Balls are a delightful homemade treat that captures the beloved taste of Butterfinger candy bars in a bite-sized form. With their irresistible combination of peanut butter, crunchy Butterfinger, and rich chocolate, these no-bake confections are sure to become a new favorite in your household. Whether you’re looking for a sweet snack, a crowd-pleasing dessert, or a unique addition to your party spread, Butterfinger Balls are a must-try recipe that will leave your taste buds thoroughly satisfied.
So what are you waiting for? Gather your ingredients and get ready to indulge in the delectable world of Butterfinger Balls. This easy-to-make, customizable treat is sure to become a new staple in your culinary repertoire. Enjoy!
More Related Recipes You Might Enjoy
- Creamy Mozzarella Chicken Linguine with Garlic Cajun Butter
- No-Bake Orange Creamsicle Truffles
- Peanut Butter and Jelly Oats
For more snack ideas and kitchen inspiration, follow me on Pinterest.
Print
Create Irresistible Butterfinger Balls in Just 5 Easy Steps!
- Prep Time: 20 minutes
- Cook Time: 10 minutes
- Total Time: 1 hour
- Yield: 24 balls 1x
- Category: Dessert
- Method: No-Bake
- Cuisine: American
- Diet: Vegetarian
Description
Get ready to indulge in a truly delectable treat – Butterfinger Balls! These irresistible bite-sized confections combine the beloved flavors of Butterfinger candy bars with a creamy, peanut butter-infused center, all dipped in a rich chocolate coating. Whether you’re looking for a decadent dessert, a sweet snack, or the perfect addition to your party spread, Butterfinger Balls are sure to delight your taste buds and impress your guests.
Ingredients
- 4 tablespoon butter, softened
- 1 teaspoon vanilla extract
- 1 cup peanut butter (avoid all-natural varieties that separate)
- 1 cup powdered sugar
- 3/4 cup graham cracker crumbs
- 1/2 cup crushed Butterfinger bars
- 8 ounce chocolate bark or chocolate chips for coating
Instructions
1. In a large bowl, combine the softened butter, vanilla extract, peanut butter, powdered sugar, graham cracker crumbs, and crushed Butterfinger bars. Mix the ingredients together until they are fully combined and the mixture has a dough-like consistency.
2. Take the peanut butter mixture and roll it into 1-inch balls, placing them on a parchment-lined baking sheet as you go. Once all the balls are formed, place the baking sheet in the freezer for 20-30 minutes to firm up the balls.
3. While the balls are chilling, melt the chocolate bark or chocolate chips in a microwave-safe bowl, stirring every 30 seconds until the chocolate is smooth and fully melted.
4. Remove the firm Butterfinger Balls from the freezer and, one by one, dip them into the melted chocolate, making sure to coat them fully. Allow any excess chocolate to drip off before placing the coated balls back on the parchment-lined baking sheet.
5. If desired, sprinkle the freshly coated Butterfinger Balls with extra crushed Butterfinger pieces, festive sprinkles, or a light dusting of coarse sea salt while the chocolate is still wet.
6. Finally, place the baking sheet with the coated and topped Butterfinger Balls in the refrigerator until the chocolate is fully set, about 30 minutes to an hour. Once chilled, your delectable Butterfinger Balls are ready to be enjoyed! Store them in an airtight container in the refrigerator until ready to serve.
Notes
For the best texture and flavor, it’s important to use a traditional peanut butter that doesn’t separate, rather than an all-natural variety. The non-separating peanut butter will create a smoother, more cohesive mixture for your Butterfinger Balls.
Properly storing your Butterfinger Balls is key to maintaining their freshness and texture. Keep them in an airtight container in the refrigerator, where they will stay fresh for up to 1 week. You can also freeze the uncoated balls for up to 3 months, then thaw and coat them in chocolate when ready to serve.
Nutrition
- Serving Size: 150
- Calories: 9
- Sugar: 12g
- Sodium: 18mg
- Fat: 5g
- Saturated Fat: 4g
- Unsaturated Fat: 0g
- Trans Fat: 0g
- Carbohydrates: 3g
- Fiber: 18g
- Protein: 1g
- Cholesterol: 0mg

