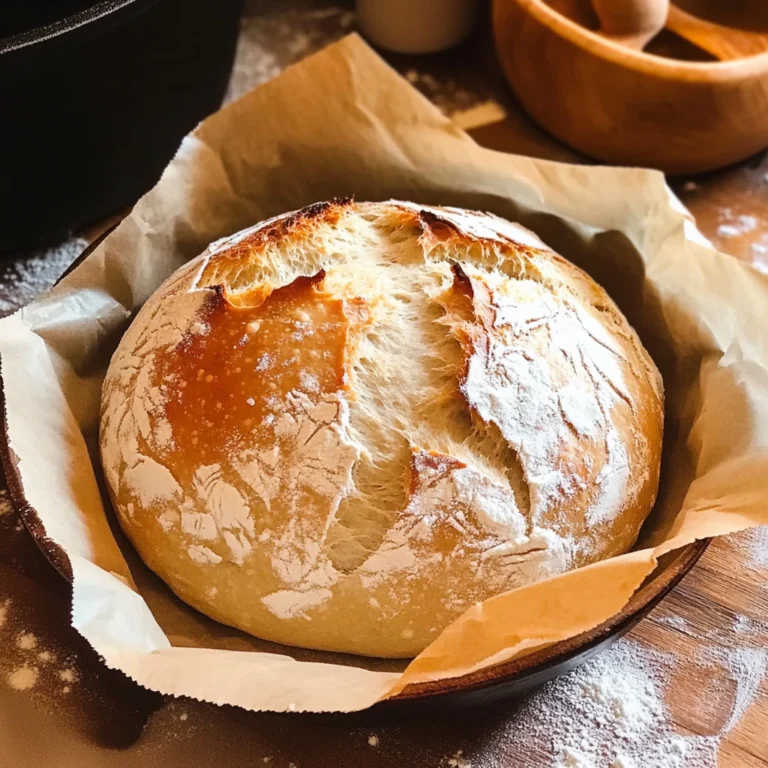
Baking Easiest Yeast Bread at home is a delightful way to fill your kitchen with the irresistible aroma of freshly baked bread. Whether you’re a seasoned baker or a novice in the kitchen, this simple recipe is the perfect starting point to dive into the world of homemade bread making. With just a few basic ingredients and minimal effort, you can enjoy the satisfaction of crafting your own warm, fluffy loaf.
Table of Contents
Unlocking the Secrets of Yeast Bread
Yeast bread has long been a staple in many households, providing a versatile canvas for both savory and sweet creations. The magic of Easiest Yeast Bread lies in the power of yeast, a living organism that ferments the sugars in the dough, releasing carbon dioxide and creating that signature airy texture. By understanding the role of each ingredient and the proper techniques, even the most timid bakers can master the art of baking Easiest Yeast Bread with confidence.
Gathering the Essential Ingredients
To make Easiest Yeast Bread, you’ll need just a handful of simple ingredients:
- 3 cups all-purpose flour
- 1 packet (2 ¼ teaspoons) active dry yeast
- 1 tablespoon sugar
- 1 tablespoon salt
- 1¼ cups warm water (about 110 °F / 43 °C)
- 2 tablespoons olive oil (optional)
The all-purpose flour provides the structure and foundation for the bread, while the yeast is the key ingredient that brings it to life. The sugar helps activate the yeast, and the salt enhances the overall flavor. The warm water helps the yeast thrive, and the optional olive oil adds a subtle richness to the dough.
Step-by-Step Guide to Easiest Yeast Bread
Activate the Yeast
Begin by combining the warm water and sugar in a large mixing bowl. Sprinkle the yeast over the water and let it sit for about 5-10 minutes, until the mixture becomes foamy and active.
Mix the Ingredients
Add the salt and olive oil (if using) to the yeast mixture and stir to combine. Now, gradually incorporate the all-purpose flour, one cup at a time, stirring with a wooden spoon until a shaggy dough forms.
Knead (Optional)
If desired, you can knead the dough for 1-2 minutes on a lightly floured surface. However, this step is optional, as the Easiest Yeast Bread recipe doesn’t require extensive kneading.
First Rise
Cover the bowl with a clean kitchen towel or plastic wrap and let the dough rise in a warm place for about one hour, or until it has doubled in size.
Shape the Dough
After the first rise, gently punch down the dough to release any air bubbles. Lightly flour a surface and turn the dough out. Shape it into a loaf and place it in a greased 9×5-inch loaf pan.
Second Rise
Cover the shaped dough and let it rise for an additional 30 minutes while you preheat your oven to 375 °F (190 °C).
Bake to Perfection
Bake the Easiest Yeast Bread in the preheated oven for 30 minutes, or until the loaf is golden brown and sounds hollow when tapped on the bottom.
Cool and Enjoy
Remove the bread from the oven and let it cool in the pan for 10 minutes before transferring it to a wire rack to cool completely. Slice and savor the warm, freshly baked Easiest Yeast Bread!
Common Mistakes and Troubleshooting
While Easiest Yeast Bread is a relatively straightforward recipe, there are a few common pitfalls to be aware of:
Not Activating the Yeast Properly
If your yeast doesn’t become foamy and active after the initial 5-10 minutes, it may be expired or the water temperature wasn’t warm enough to activate it. Start over with fresh yeast and ensure the water is between 110-115°F.
Over or Under Kneading the Dough
Kneading the dough too much can result in a tough, dense texture, while not kneading enough can lead to a lack of gluten development and a crumbly loaf. Aim for the recommended 1-2 minutes of kneading, or skip it altogether for the Easiest Yeast Bread.
Incorrect Rising Times
If the dough doesn’t rise as expected, check the temperature of your rising environment. Yeast thrives in warm, draft-free areas. Adjust the rising time as needed until the dough has doubled in size.
Baking Issues
Make sure your oven is properly preheated to the correct temperature. Overbaking can lead to a hard, dry crust, while underbaking will result in a doughy interior.
Customizing Your Easiest Yeast Bread
The beauty of Easiest Yeast Bread is that it serves as a blank canvas, allowing you to unleash your creativity and personalize it to your taste. Consider adding:
- Herbs and Spices: Fold in fresh or dried herbs like rosemary, thyme, or oregano, or add a dash of garlic powder or Italian seasoning.
- Seeds and Nuts: Sprinkle in sesame seeds, sunflower seeds, chopped walnuts, or even a handful of chopped olives for a savory twist.
- Whole Wheat Flour: Substitute up to 50% of the all-purpose flour with whole wheat flour for a heartier, nuttier flavor.
- Sweetness Adjustments: Increase the sugar for a slightly sweeter bread, or reduce it for a more neutral flavor profile.
Serving and Storing Your Easiest Yeast Bread
Once your Easiest Yeast Bread has cooled, it’s time to enjoy! Slice and serve it alongside soups, stews, or your favorite dips and spreads. The versatility of this homemade bread makes it a perfect accompaniment to a wide range of meals.
To store your freshly baked loaf, allow it to cool completely before wrapping it in plastic or foil. Keep it at room temperature for up to 3 days. For longer storage, slice the bread and freeze it in an airtight container or resealable bag for up to 3 months.
More Related Recipes You Might Enjoy
FAQs About Easiest Yeast Bread
Q1: What is the best way to store homemade yeast bread for maximum freshness?
To store homemade yeast bread and keep it fresh, first allow it to cool completely on a wire rack. Once cooled, wrap the bread in plastic wrap or aluminum foil to prevent it from drying out. For longer storage, place the wrapped bread in a resealable plastic bag or an airtight container and store it at room temperature for up to 3 days. If you want to keep it longer, consider freezing the bread. Slice it before freezing so you can take out only what you need. Wrap it tightly in plastic wrap and then in aluminum foil to prevent freezer burn. Thaw at room temperature or toast slices directly from the freezer.
Can I add additional ingredients like cheese or vegetables to the easiest yeast bread recipe, and how should I incorporate them?
Yes, you can definitely add ingredients like cheese, herbs, or vegetables to your easiest yeast bread recipe! To incorporate these ingredients, it’s best to mix them in after you have combined the initial dough and before the first rise. For cheese, you can fold in shredded cheese directly into the dough. If you’re adding vegetables, ensure they are cooked, cooled, and chopped finely to prevent excess moisture from affecting the dough. Start with small amounts (about 1/2 to 1 cup) and adjust according to your taste, making sure not to overwhelm the basic dough structure.
How can I enhance the flavor of my yeast bread without using extra sugar or fat?
To enhance the flavor of your yeast bread without adding extra sugar or fat, consider using ingredients like herbs, spices, or whole grains. Fresh or dried herbs (like rosemary, thyme, or basil) can be mixed into the dough for a savory flavor. Spices such as garlic powder, onion powder, or even a hint of cinnamon can add depth without added calories. Additionally, using a portion of whole wheat flour instead of all-purpose flour can provide a nuttier flavor and healthier profile. You can also try adding a splash of vinegar or a tablespoon of honey (which is still a sugar but in a smaller quantity) to enhance the yeast’s action and improve the overall taste.
What are some common signs that my yeast bread dough has risen enough?
There are a few signs to look for to determine if your yeast bread dough has risen enough. First, the dough should have roughly doubled in size after the first rise, which usually takes about 1 to 2 hours depending on temperature and humidity. You can also perform the “poke test”: gently poke the dough with your finger; if the indentation remains and doesn’t spring back, it’s a good indication that the dough has risen adequately. Additionally, the surface of the dough should appear smooth and possibly slightly domed. If it springs back quickly, it may need more time to rise.
Concluding the Easiest Yeast Bread Journey
Baking Easiest Yeast Bread at home is a rewarding experience that allows you to enjoy the satisfaction of creating a freshly baked loaf from scratch. With this simple recipe and a little patience, you can master the art of yeast bread making and impress your family and friends with your homemade culinary creations. So, preheat your oven, gather your ingredients, and let’s embark on a delicious journey to create the Easiest Yeast Bread you’ve ever tasted!
For more snack ideas and kitchen inspiration, follow me on Pinterest.
Print
Bake the Easiest Yeast Bread at Home and Enjoy Fresh Flavor
- Prep Time: 15 minutes
- Cook Time: 30 minutes
- Total Time: 1 hour 45 minutes
- Yield: 1 loaf 1x
- Category: Bread
- Method: Baking
- Cuisine: American
- Diet: Vegetarian
Description
Easiest Yeast Bread is a simple recipe for homemade bread that fills your kitchen with the aroma of freshly baked bread. Perfect for both novice and seasoned bakers.
Ingredients
- 3 cup all-purpose flour
- 1 packet (2 1/4 teaspoon) active dry yeast
- 1 tablespoon sugar
- 1 tablespoon salt
- 1 1/4 cup warm water
- 2 tablespoon olive oil (optional)
Instructions
1. Combine warm water and sugar in a large mixing bowl. Sprinkle yeast over the water and let sit for 5-10 minutes until foamy.
2. Add salt and olive oil (if using) to the yeast mixture and stir to combine. Gradually incorporate all-purpose flour, one cup at a time, stirring until a shaggy dough forms.
3. Knead the dough for 1-2 minutes on a lightly floured surface if desired.
4. Cover the bowl with a clean towel or plastic wrap and let the dough rise in a warm place for about one hour, or until doubled in size.
5. Punch down the dough to release air bubbles, shape it into a loaf, and place it in a greased 9×5-inch loaf pan.
6. Cover the shaped dough and let it rise for an additional 30 minutes while preheating the oven to 375°F.
7. Bake for 30 minutes or until golden brown and sounds hollow when tapped on the bottom.
8. Cool in the pan for 10 minutes before transferring to a wire rack to cool completely.
Notes
Store cooled bread wrapped in plastic or foil at room temperature for up to 3 days, or freeze sliced bread in an airtight container for up to 3 months.
Nutrition
- Serving Size: 1 slice
- Calories: 120
- Sugar: 0.5 grams
- Sodium: 200 milligrams
- Fat: 2 grams
- Saturated Fat: 0.5 grams
- Unsaturated Fat: 1.5 grams
- Trans Fat: 0 grams
- Carbohydrates: 22 grams
- Fiber: 1 gram
- Protein: 3 grams
- Cholesterol: 0 milligrams